git-svn rapidinho

Todo mundo usando git e você preso no svn por que seu projeto é grande demais pra mudar assim de repente, e blá, blá, blá? Sente-se por fora por ter de usar um controle de versões centralizado? No more (or less)!

O pacote (Debian/Ubuntu) git-svn faz a ponte entre repositórios svn externos e git locais, e tem uma boa explicação de como usá-lo na wiki do GNOME: Git for GNOME developers

Lá você encontra os porquês de cada comando, aqui temos um resumo rapidinho (jabá: usando o projeto Python Launcher como exemplo):

Baixe do repositório subversion:

$ git-svn clone --username username https://garage.maemo.org/svn/pylauncher/trunk pylauncher

Crie seu branch e mude pra ele:

$ git checkout -b minhas_paradas

Não altere o master branch diretamente, ele deve representar a repositório svn, sempre trabalhe nos branches. Você manda seu trabalho pro master apenas na hora de subir as alterações pro svn.

Com as alterações feitas e commitadas no seu branch, volte para o master e faça o merge:

$ git checkout master
$ git merge --squash minhas_paradas

Faça o commit pro git:

$ git commit -a -m "Funcionalidade tal implementada."

E agora pro svn:

$ git-svn dcommit

E é isso. Pra manter o seu master branch atualizado em relação ao repositório svn use o rebase do git-svn:

$ git checkout master
$ git-svn rebase

Dica: Open VM Tools

Se você está fazendo uma appliance Linux para o VMware, não deixe de instalar o Open VM Tools no sistema guest. Vai te permitir copiar e colar texto e arrastar e soltar arquivos entre o sistema guest e o host. Se o guest é baseado em Debian, sugiro o pacote mantido pelo Daniel Baumann.

Você deve pegar o pacote fonte (ele contém uns módulos pro kernel, então é necessário compilar para cada caso) e construí-lo dentro da vm. Esse script deve ajudar: install_openvmtools.sh Ele baixa, instala as dependências, instala o pacote, compila e instala os módulos do kernel e faz aconselhamento sentimental. Mas atenção: verifique a url e versão do pacote no script, você pode ter de atualizar alguma coisa. Claro que eu poderia ter adicionado o repositório unstable e dado um apt-get source, mas eu quis assim.

Uma vez instalado você pode ter 2 problemas: a rede do guest pára de funcionar, e toda vez que reinicia aparece uma mensagem de erro por parte do vmplayer reclamando de problemas no script de poweron.

Quanto à rede, você deve informar o vmware que está usando o módulo vmxnet e não o pcnet32, incluia essa linha no arquivo vmx:

ethernet0.virtualDev = "vmxnet"

Reinicie a vm e verifique se a rede está funcionando, e tente também:
$ lspci | grep Ethernet
00:10.0 Ethernet controller: VMware Inc VMware High-Speed Virtual NIC [vmxnet] (rev 10)

Quanto ao erro do script de poweron, rode o vmware-toolbox dentro da sua vm, vá na aba “Scripts” e desabilite tudo descaradamente. É uma solução.

O pacote open-vm-tools deve entrar no Ubuntu Hardy, mas parece que ainda está capenga.

Resizing Maemo SDK VMware Appliance Virtual HD

I’ve received some suggestions to increase the Maemo SDK VMware Appliance virtual hd size in the next release, which is now about 6.5G, and also questions about how to extend its size right now, with the users own hands. In this post I explain the later in the form of a how to.

The tools needed are qemu-img and a livecd iso of RIP (Recover Is Possible) Linux distribution. It could be any small recorver distro you like, but this just do fine for me. You can do this operation from a Windows box if (for some reason) you want to, since the only tools needed in the host system are the said qemu-img, the RIP Linux iso and a VMWare Player.

Now to the How To.

1. Convert the virtual disk from VMDK to qemu raw format.

The virtual hd file if of the vmdk format and we need to convert it to the resizable qemu raw format.

$ qemu-img convert -f vmdk maemo-sdk.vmdk -O raw maemo-sdk.raw

2. Resize it.

I will use 10G, and from this point on the numbers used will reflect it. If you want a different size, check the values you supply for the tools used in this tutorial.

$ dd if=/dev/zero of=maemo-sdk.raw seek=10240 obs=1M count=0 conv=notrunc

The dd command will fill with zeros from the current end point of the virtual hd file to the size supplied in the seek parameter, in this case 10240 blocks of size indicated by obs=1M.
If the output appears as nothing have happened, do just like me and ignore it.

3. Convert it back to VMDK
Delete the original

qemu-img convert -f raw maemo-sdk.raw -O vmdk maemo-sdk.vmdk

4. Resize the partition inside the guest system.
With the virtual hardware changed, you go up to the filesystem level, but you have to do it from another system than the installed on the guest, thus we will work from the RIP live cd, running it on VMware.

4.1. Download the non-X version, for we will use only the shell for this job. Put it in the same directory of the vmware image.

Here: http://www.tux.org/pub/people/kent-robotti/looplinux/rip/RIPLinuX-4.3.iso

4.2. Now, edit the vmx file, which is the one that describes the virtual machine to VMware Player. Search for this line

ide1:0.present = "FALSE"

Comment it and add the following

#ide1:0.present = "FALSE"
ide1:0.present = "TRUE"
ide1:0.autodetect = "FALSE"
ide1:0.startConnected = "TRUE"
ide1:0.fileName = "RIPLinux-4.3-non-X.iso"
ide1:0.deviceType = "cdrom-image"

4.3. Boot the RIP live cd image.
With this you can boot from the live cd image. You can, but the vmplayer will not do it, unless you restart the virtual machine and press ESC when it begins to initialize, then select the option to boot from the cd-rom.

4.4. Delete all partitions in the virtual hds.
No, i’m not crazy, and you will not lose anything. At least if follow these instructions. 🙂
Log in to the RIP system as root, and get the hammer, i mean, call fdisk in the command prompt.

# fdisk /dev/hda

Notice that even this being an step by step guide, some familiarity with fdisk is desirable to understand what is happening. And as said before the numbers used as parameters are valid for this specific case: resize the Maemo SDK Appliance, version 0.4, to 10G.

Now, you should see the fdisk’s prompt, issue a print command to see the current state.

(fdisk's prompt): p

And the following commands should remove the current partitions.

(fdisk's prompt): d

Answer 1 to remove the root partition, repeat the command and answer 2 to remove the swap.
Check again to see that they’re gone:

(fdisk's prompt): p

And write the changes and quit with

(fdisk's prompt): w

4.5. Recreate the partitions with the new sizes.
Call fdisk again, and issue a “new” command:

# fdisk /dev/hda
(fdisk's prompt): n

Answer the questions that will appear with these values:
p, to create a primary partition
1, for the number of the partition
1, for it to start in the first cylinder
21529, for the last cylinder of this partition (cylinders are so old school 🙂

Now for the swap partition.

(fdisk's prompt): n

Then answer:
e, for extended partition
2, for the number of the partition
And accept the default values for the two following questions, which are about the first and last cylinders. This will give the remaining disk space (about 300M) to the swap.

Inside the extended partition we create the logical partition, where the swap will live.

(prompt do fdisk): n

Answers:
l, to create the logical partition
And accept the default values for this logical partition fill the extended one.

Finally, we change the type of the last partition from Linux (its default) to Linux SWAP.

(prompt do fdisk): t

Answer 5, and then 82. The number of the partition and the code for swap, respectively.

Write the changes and get out.

(prompt do fdisk): w

And for the very last step of this part, you setup the swap as true swap.

# mkswap -v1 /dev/hda5

4.6. Check the root partition…

# e2fsck -f /dev/hda1

4.7. … and resize it.

# resize2fs /dev/hda1 9934M

4.8. Now, reboot with

# shutdown -r now

5. Try it on vmware player.
After the shutdown command it will boot normally, ignoring the live cdrom (even it still being setup on the vmx file, from item 4.2 of this how to; you should restore the vmx file to its early state).
Now open a terminal on the guest system and issue the df command:

$ df -h

The new size should be 9.6 G as in this line

/dev/sda1 9.6G 4.7G 4.6G 51% /

Notice that for some mysterious (to me) reason the virtual harddisk now show up as /dev/sda instead of /dev/hda, but it works anyway.

This is it, any problems drop me a comment.

Criando Imagens pro VMware

Aqui vai um roteiro rápido para produção de imagens do VMware a partir de umas anotações que fiz durante a produção da Maemo SDK VMware Appliance aqui no INdT.

Disco Virtual

Usamos o qemu-img para criar um HD virtual de 7G. O arquivo criado possui inicialmente 960k, ele irá crescer conforme a necessidade até atingir o tamanho máximo.

$ qemu-img create -f vmdk maemo-sdk.vmdk 7G

Descritor da imagem

Um arquivo VMX descreve as características da máquina virtual da sua imagem. Essa imagem tem 512M de RAM, a ide0 aponta para o disco virtual que criamos (maemo-sdk.vmdk), a ide1 apontando para o arquivo ISO que contém o sistema a ser instalado. Pra o arquivo a seguir foi criado um link simbólico chamado cdrom.iso para o cd de instalação do Xubuntu.

Arquivo de exemplo: maemo-sdk.vmx

#!/usr/bin/vmware
#
displayName = "Linux 2.6.x Host"
guestOS = "otherlinux"
#
config.version = "8"
virtualHW.version = "4"
memsize = "512"
#
ide0:0.present = "TRUE"
ide0:0.fileName = "maemo-sdk.vmdk"
#
ide1:0.present = "TRUE"
ide1:0.autodetect = "FALSE"
ide1:0.startConnected = "TRUE"
ide1:0.fileName = "cdrom.iso"
ide1:0.deviceType = "cdrom-image"
#
floppy0.present = "FALSE"
usb.present = "TRUE"
sound.present = "TRUE"
#
displayuName = "Maemo SDK Appliance"
#
checkpoint.vmState = ""
#
scsi0:0.redo = ""
ide0:0.redo = ""
#
extendedConfigFile = "maemo-sdk.vmxf"
virtualHW.productCompatibility = "hosted"
tools.upgrade.policy = "manual"
#
isolation.tools.hgfs.disable = "FALSE"
#
ethernet0.present = "TRUE"
ethernet0.connectionType = "nat"
ethernet0.addressType = "generated"
ethernet0.generatedAddress = "00:0c:29:c7:60:13"
ethernet0.generatedAddressOffset = "0"
uuid.location = "56 4d 4b 68 5e 47 c7 0b-33 1f 73 b1 f9 c7 60 13"
uuid.bios = "56 4d 4b 68 5e 47 c7 0b-33 1f 73 b1 f9 c7 60 13"
tools.remindInstall = "FALSE"
#
uuid.action = "create"
#
sharedFolder.option = "alwaysEnabled"
tools.syncTime = "TRUE"
#
usb.autoConnect.device0 = ""
#
floppy0.fileName = "/dev/fd0"

Instalacão do Sistema

Rodamos o VMWare Player

$ vmplayer maemo-sdk.vmx

e procedemos como numa instalação comum.

Pós-instalacão

Depois de tudo pronto desabilitamos o cdrom, substituindo o trecho

ide1:0.present = "TRUE"
ide1:0.autodetect = "FALSE"
ide1:0.startConnected = "TRUE"
ide1:0.fileName = "cdrom.iso"
ide1:0.deviceType = "cdrom-image"

por

ide1:0.present = "FALSE"

Daí podemos remover pacotes desnecessários para emagrecer a imagem. O OpenOffice.org é um dos mais obesos e provavelmente o sujeito que pegar a imagem já vai ter algum office instalado no sistema host. Para descobrir bons alvos para matar vá na linha de comando do sistema instalado na imagem e dê um:

dpkg-query -W --showformat='${Installed-Size} ${Package}\n' | sort -n

Pra facilitar um pouco, eis a lipo que fiz no Xubuntu:

apt-get remove --purge libpurple0 gimp-print cdparanoia wireless-tools ubuntu-standard network-manager avahi-daemon gnome-games gnome-cards-data dvd+rw-tools abiword-common abiword powernowd gnumeric-common pidgin-data parted network-manager-gnome gnumeric-gtk libnss-mdns tasksel-data laptop-mode-tools avahi-autoipd ubuntu-minimal gnome-games-data mozilla-thunderbird powermanagement-interface xubuntu-desktop tasksel acpi-support gimp wpasupplicant laptop-detect pidgin displayconfig-gtk brasero hotkey-setup abiword-plugins gimp-data example-content thunderbird orage apport apport-gtk python-apport update-manager update-manager-core update-notifier update-notifier-common xfce4-appfinder

Cuidado que essa lista pode não ser legal para a sua appliance, analise com cuidado. Um dos efeitos colaterais das remoções acima foi a conexão de rede da imagem parar de funcionar, devido à ausência do NetworkManager (que não faz muito sentido numa imagem). Foi necessário editar o /etc/network/interfaces e acrescentar as linhas:

auto eth0
iface eth0 inet dhcp

Depois reinicie as interfaces de rede:

sudo /etc/init.d/networking restart

Outra coisa útil é habilitar o login automático com o GDM, para isso basta is em System->Administration->Login Window e na aba Security marque Enable Automatic Login com o usuário que criado na instalação. Ainda na mesma aba, na seção Permissions escolha Allow login if all write permissions on user’s home directory (alguém me contou que isso resolve um inexplicável bug do tema).

Depois você pode acrescentar as aplicações relevantes, mudar o tema, etc.

VMware Tools e Open Virtual Machine Tools

VMware Tools são ferramentas que podem ser instaladas no sistema da imagem vmware e que acrescentam funcionalidades de arrastar e soltar arquivos e cópia e colagem de texto entre o sistema hospedeiro e o sistema virtualizado. Além disso faz com que o ponteiro do mouse não fique preso na janela do VMware Player, o que ajuda muito os claustrofóbicos e as pessoas que não gostam de sentir presas.

O problema do VMware Tools é que ele não pode ser livremente distribuído junto com a imagem que você produziu, o que significa que o usuário deverá proceder a instalação por conta própria, o que é uma droga. Ainda mais porque a obtenção do instalador é meio cabeluda.

Felizmente a VMware liberou os tools sob licenças GPL, LGPL e compatíveis, criando o projeto Open Virtual Machine Tools. Infelizmente tem sido um cu de boi pra instalar essa coisa! Ou seja, tem make install não mermão! A documentação sobre empacotamento ajudou bastante, mas ainda era coisa muito chata, mas eis que de repente surge Daniel Baumann do Debian e empacota os tools pro repositório experimental. \o/

Update: depois de instalar pacotes na imagem não esqueça de dar um sudo apt-get clean para remover os debs do diretório /var/cache/apt/archives.

Tapioca

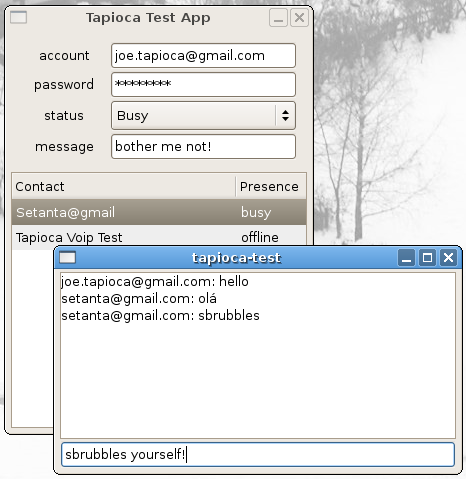
Conclui meu primeiro trabalho no INdT: um tutorial sobre como usar a Tapioca (mais especificamente tapioca-glib). Demorou mais do que devia, mas considerando que esse está concorrendo ao pior… não, mais complexo, mês da minha vida que me lembro (ou seja, dos últimos 2 anos), não foi um desempenho tão ruim (espero).

Uma idéia visual do que é Tapioca (mas o bom mesmo é ler o tutorial :).

Tapioca Diagram

E a aplicação exemplo é bem simpleszinha:

Tapioca Test Screenshot

Configurando um repositório Subversion

Ultimamente tenho configurado alguns repositórios Subversion usando a seção Version Control System do Ubuntu Server Guide, que consiste de:

  1. Instalar o servidor: sudo apt-get install subversion libapache2-svn
  2. Criar um novo projeto: svnadmin create /var/svn-repos/projeto
  3. Criar um arquivo de senhas: htpasswd2 /etc/subversion/passwd user_name
  4. Editar /etc/apache2/apache2.conf acrescentando uma entrada para o repositório do novo projeto
     <Location /svn/projeto>
      DAV svn
      SVNPath /var/svn-repos/projeto
      AuthType Basic
      AuthName "Your repository name"
      AuthUserFile /etc/subversion/passwd
      <LimitExcept GET PROPFIND OPTIONS REPORT>
      Require valid-user
      </LimitExcept>
      </Location>
  5. Uma rápida reiniciada no apache com /etc/init.d/apache2 restart e pronto.

O problema é que eles esqueceram de incluir uma parte sobre como inicializar o repositório com uma estrutura decente, então é o seguinte:

cd /tmp
mkdir projeto
mkdir projeto/trunk
mkdir projeto/branches
mkdir projeto/tags
svn import /tmp/projeto file:///var/svn-repos/projeto/ -m “initial import”
chown -R www-data:subversion /var/svn-repos/projeto
rm /tmp/projeto -rf

Desnecessário dizer que tudo tem de ser feito no servidor como root (sudo -s).

Eclipse em toda parte

Terminei dois tutoriais envolvendo o Eclipse para o site do CInLUG.
Ei-los:

Agora uma lista de plugins que fazem falta no Eclipse:

  • pkg-config
  • glade
  • gtk
  • criação de pacotes Debian

Agora uma lista do que é necessário para meu computador rodar o Eclipse decentemente:

  • processador melhor
  • mais memória